General Scenes
By pressing the EDIT buttonin VideoSwitch you enter the edit mode to create and edit scenes.
- Camera Director's Scene
- AlbumArt Scene
- General VideoSwitch Scenes

EDIT remains active. To exit the scene editing mode, click on edit again.
WARNING!
To be able to edit the scenes, the Video Switch module must be running, in Preview or Air mode.
Edit an existing scene
Right click on a button with a defined sceneto access the EDIT, RENAME and DELETE options.
To edit a scene button, proceed as follows:
- Enable edit mode by pressing EDIT on Video Switch.
- Right click on the button of the scene to be edited and choose EDIT SCENE. The scene is displayed in the Video Encoder module and the Elements Selector window appears, showing a list ofall the elements available in the system. The elements are described in 2.4 - Scene Elements (layers).
- The items checked in the Item Selector are the active items, which are visible. Any element can be activated or deactivated by checking or unchecking the box. The result is displayed in the Video Encoder viewer.
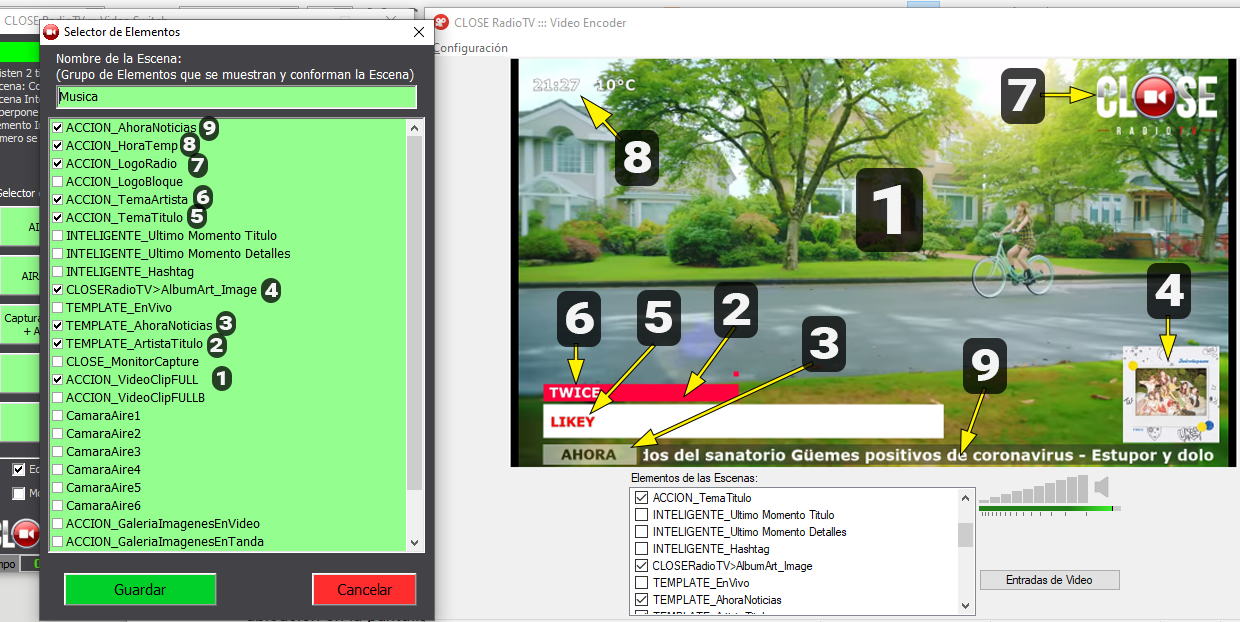
In the example image, the active elements and where they appear in the scene are indicated in the Element Selector window. The enumeration is for indicative purposes only.
Elements in a scene
The properties of the elements are edited in the Video Encoder window.
- The properties of the video sources (cameras, monitor capture and video clip element) are saved in each scene. That is, the same source can take different sizes and positions in different scenes.
- To define the size and position of a video source in a scene, we must have the Element Selector window of the scene to be edited open, so that the changes are saved in that scene.
- The properties of text and graphic elements are stored for each scene.
In this way, the same element can be reused in different ways (size, position) in different scenes. For example: if we modify the position of a text element in a scene, the change will affect only that scene.
So that a change on an element is reflected in all the scenes that use it:
- Select the element in the Element Selector window
- Right click.
- Choose Select position and size for all scenes.
It will be indicated with the legend[ALL] and when you save your changes its properties will be updated in all scenes.
- You can define an entry/exit effect for each element, which will be triggered when the visibility of the element changes during scene changes. To define the input/output effect:
- Right-click on the selected element in Video Switch.
- Choose Effect (Input / Output). The following menu will appear:
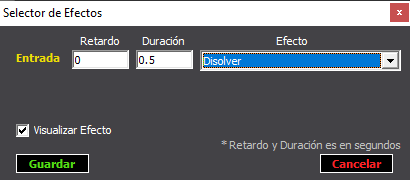
- In the drop-down menu, choose the effect.
- A delay time and duration (speed) can be defined.
- Press SAVE to save the changes to the scene and close the Element Selector window.
- The EDIT mode will remain active. At this point we can edit another scene by right clicking; or exit the edit mode by pressing EDIT again.
REMEMBER
If an existing text or graphic element is modified (e.g. its location on the screen) the modification will take effect only in the scene being edited. To update an element in all scenes, the ALL function must be activated in the Element Selector (right-click on the selected element).
A video source can have different properties in each scene. This applies to cameras, the video clip element and monitor captures.
Visibility of the elements
The visibility of the elements (layers) is determined by the order in the list, according to the order of appearance. Elements located higher in the list will be displayed above those located below. When an element is displayed in full screen (e.g. a camera) no element below it will be visible when that camera is active.
The order of the elements is the same for all scenes and is determined in the Video Encoder window. The position of an element is changed by selecting it and pressing Ctrl andCtrl (see Scene Elements below).
Create/Edit scenes
To create a scene, proceed as follows:
- Press EDIT.
- Right click on a free button and choose CREATE SCENE.
- The Element Selector editing window will be displayed, with the same settings as the currently active scene, i.e. the one we are viewing on the Video Encoder monitor. So the new scene always starts as a copy of the current scene.
- Activate/deactivate the elements available in the list to compose the scene.
- Adjust the display of video sources (position and size of cameras, monitor captures and video clip element).
- Enter a name for the scene. For convenience of display, try to use short names.
- Press SAVE to save the scene.
- Deactivate the Edit mode to return to normal operation.
NEW ELEMENTS ON THE SCENE
If the scene will contain elements that are not yet available in the list, it is necessary to first create the elements (texts, images, SMART elements). This is done from the VideoEncoder.
Video sources can be modified for each scene. It is not necessary to duplicate them. Their properties (position, size) are stored in the scene with dependency on each other.
Rearrange scene buttons
When the Edit Mode is active, the Reorder buttons option is enabled. Enabling this option switches the button panel to edit mode, which allows you to drag the buttons to change their position.